
Your Northern Beaches garden might have gentle dunes or a sloping yard – either way, a retaining wall can help sculpt the space (and stop runoff). This blog is your friendly guide to low cost retaining wall solutions Northern Beaches, from DIY pine sleepers to clever gabions and lush living walls.
We’ll mix practical tips with cheeky analogies (think “building Lego for your garden”), local beachy vibes and even a touch of humor. By the end, you’ll know which budget-friendly wall is right for your home, how much it roughly costs in AUD, and even which are the greenest options. Ready to dive in? Let’s get our hands dirty (metaphorically)!
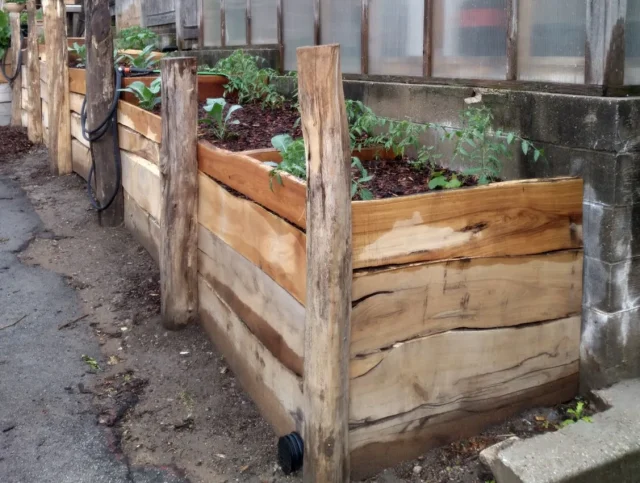
1. Timber Sleeper Walls (Treated Pine)
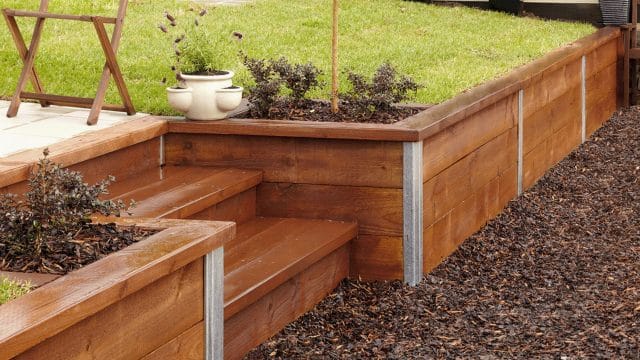
What: Stacked horizontal sleepers made of treated timber (often pine). It’s like building a giant wooden Lego wall in your backyard.
Description: Treated pine sleepers (or railway ties) are a classic Aussie choice – warm, natural-looking, and quite DIY-friendly. You can stack them flat or even stand them vertically. They’re readily available at hardware stores and can be cut to length. Imagine a rustic beach shack vibe blending right into a sunny Northern Beaches garden!
- Pros: Very cheap and easy to install. At roughly $250–$350 per m² (for a 1m-high wall), pine sleepers are among the least expensive materials around. (You’ll often see quotes like ~$350–450 per metre for a 1m-high wall.) They create a warm, natural look that melts into coastal landscaping. Sleepers are lightweight enough for DIY (just get a mate or two for lifting) and stack like big Lego bricks.
- Cons: Wood does rot eventually. Even treated pine lasts only about 15–20 years, especially if it sits in wet soil. You’ll probably need galvanized steel posts between the timbers to hold things strong and extend life. Also, without a good drainage gap behind the wall, water pressure can build up (so add gravel behind it).
- Cost Estimate: Very affordable. Hipages quotes $250–$350/m² for treated pine walls. For a 10 m² wall (10 m long, 1 m high), that’s only about $2.5–3.5k installed. Even a few hundred dollars’ worth of sleepers plus a bobcat rental can cover small jobs.
- Suitability: Best for low-to-medium walls (up to ~1m high) in well-drained soil. Perfect for flat or gently sloping backyards like many on the Northern Beaches. Great for flower beds, veggie patches or leveling a small slope. If your yard is very steep or heavy rain runs off it, you might need to terrify it with something sturdier.
- Eco-Factor: Timber is a renewable resource. Choose H4-treated timber from sustainably managed forests and your wall will be biodegradable at the end of life (unlike plastic or concrete). Just be aware the preservatives aren’t 100% eco-friendly.
2. Concrete Sleeper Walls
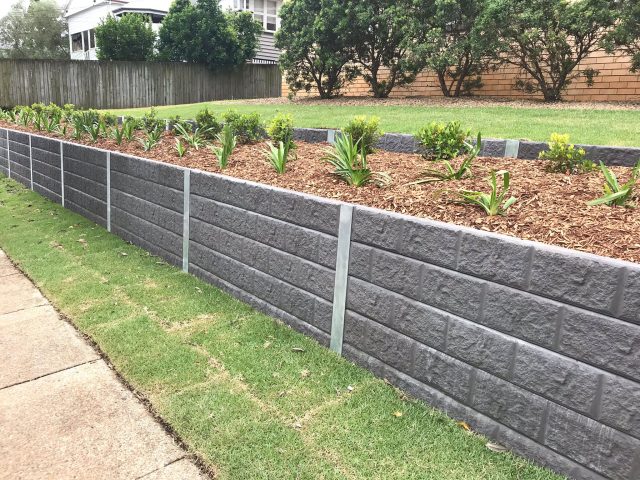
What: Pre-cast concrete “sleepers” (long beams) bolted to steel posts. Think of it as a more industrial cousin of the timber sleeper wall.
Description: These large concrete beams (often 2.4–3m long) can be slotted between steel uprights. They look similar to timber sleepers but last way longer. You’ll need machinery (like a small excavator or crane) to lift them. It’s more of a pro job, but some handy DIYers do it for medium slopes. In the Northern Beaches, they’re common for higher walls or tricky sites where wood wouldn’t cut it.
- Pros: Extremely durable. A concrete sleeper wall can last 20–30 years or more. It won’t rot, warp or attract termites. It also often includes a hidden drainage channel. Very strong – suitable for taller walls (over 1m) and heavy loads (like a driveway behind it). Appearance is simple and clean (grey modern look).
- Cons: Higher cost and effort. You’re looking at roughly $480–$680 per linear metre (for a 1m-high wall) – about double a pine sleeper in some cases. Plus you’ll need steel posts and concrete footings. You almost certainly need a small digger and a tradie, so factor labor. It’s not something you’ll DIY unless you’re a pro.
- Cost Estimate: Approximately $480–680 per linear metre for a 1m-high wall. For a 10m wall (1m high) that’s $4.8–6.8k, plus footing.
- Suitability: Ideal for higher or high-load walls (like retaining a driveway or leveling a steep yard). Also great if you want a sleek, modern look. A bit overkill for a tiny garden bed though.
- Eco-Factor: Concrete has a higher carbon footprint than timber. However, its long life offsets some of that (fewer replacements needed). It also doesn’t leach chemicals like treated wood might.
3. Concrete Block (Besser/Cinder Block) Walls
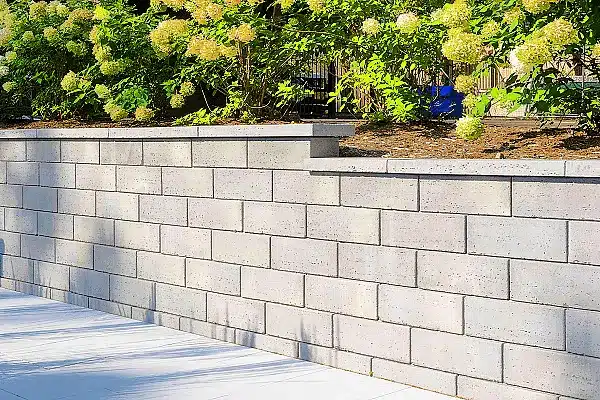
What: Stacked concrete blocks (Besser or breeze blocks) or interlocking concrete retaining blocks. It’s like a giant stack of Lego blocks – but big, heavy, and grey.
Description: These are the standard “concrete block” walls you see everywhere. You can dry-stack them or mortar them. They come in various textures and sizes. In Aus, we call them Besser blocks or masonry blocks. They can be reinforced with rebar if needed. It’s a very strong option, though often done by professionals.
- Pros: Durable and strong. A block wall can last 50+ years with proper drain and footing. It handles bigger walls well and is fire-proof. Standard blocks are cheap, and you can even DIY stack smaller garden walls. They’re also easy to anchor fences or posts onto.
- Cons: Industrial look and weight. Plain grey blocks look heavy-handed in a beach garden (though moss and paint can soften them). Installation is labor-intensive – each block is heavy (roughly 20 kg). You need a good concrete footing or trench and drainage behind to keep it stable.
- Cost Estimate: Around $400–550 per m² for basic blocks, or $550–700/m² for the most common “besser” block walls. This is for supply+install (very rough ballpark). For example, a 10×1m wall might be $4–7k.
- Suitability: Good for medium-height walls (1–2m). Great for modern gardens or places where you’ll cover the blocks with render, paint or cladding. DIY for small walls (about 1m high) is possible. For anything big, plan on a builder.
- Eco-Factor: Concrete blocks are carbon-intensive. However, if you can find ones with recycled content (or even repurpose old bricks), that helps. They’re inert and don’t leach toxins.
- Note: For more detailed costs and designs, check out the Hipages retaining wall guide – they break down prices and materials for Aussie homes.
4. Gabion Basket Walls
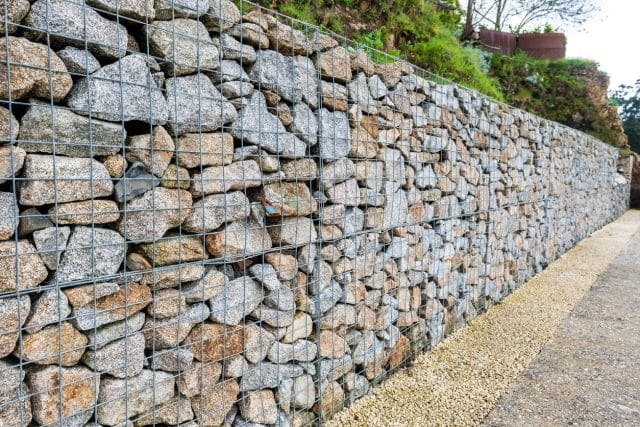
What: Sturdy wire cages (gabions) filled with crushed stone or rubble. Picture a giant metal basket of rocks – that’s a gabion wall.
Description: Gabions give a trendy, rugged look. You buy or build a wire mesh cage, stack them if needed, and fill with stones (often local river rocks or quarry gravel). They drain easily (no pressure buildup) and can be very DIY-friendly if you have a source of stones and some muscle. They’re perfect for a coastal style (stone against water vibes!).
- Pros: Cost-effective and natural-looking. If you can source free or cheap rock (like offcuts from a landscape supply), they’re very inexpensive. A recent builder notes that gabions are “cost-effective yet visually appealing”. They’re easy to build – just stack baskets and fill. Excellent drainage means no cracking or blowouts. Over time plants can moss up the stones, blending into the garden.
- Cons: Mesh and fill work. The steel mesh can eventually corrode (expect 20-30 years life) unless you use galvanized or PVC-coated. Filling the cages with rock is laborious. Gabions also tend to be best for fairly straight, wide walls (because each basket has a thickness). If you want a perfectly flat face, the surface is irregular by design.
- Cost Estimate: Varies widely. The mesh cages cost money (say a few hundred per linear metre for good galvanised cages), and then stone can cost $50–100 per tonne if bought. A ballpark might be $400–600 per running metre for a small (~0.5m tall) wall, more for taller. (It’s comparable to concrete blocks if you need to buy all materials.) But if you get free rock, it’s far cheaper.
- Suitability: Great for slopes and drainage-priority areas. Also ideal if you want an “industrial-natural” look (think Moorish castles by the water). Fit for many Northern Beaches yards that catch lots of rain – the gaps help water pass through. DIY feasible if baskets and rocks on site.
- Eco-Factor: Very eco-friendly if you use local stone (low transport energy). No mortar means less cement too. The rock fill is inert, and the steel can be recycled later. Overall one of the greener hardscape choices.
5. Natural Stone or Boulder Walls
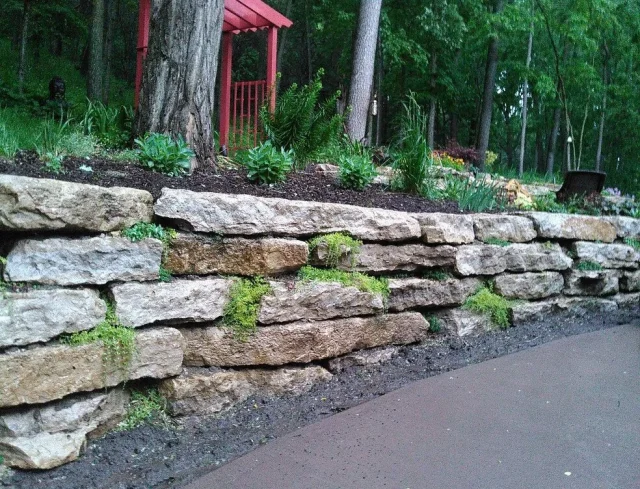
What: Stacked stone walls using quarried or field stones (e.g. sandstone, granite, or even large boulders). Think of a park retaining wall made of big irregular rocks.
Description: These walls are truly timeless – imagine the old stone sea walls you see on the coast. Builders often dry-stack them (no mortar) for a rustic look. You can use medium-sized blocks or mix huge boulders. In a beachside yard, a sandstone wall looks like it always belonged.
- Pros: Classic and durable. Stone walls can last centuries. According to experts, they “give your landscape a natural, classic and timeless look” and actually cost less than many expect – one team notes stacked stone walls “look super expensive but actually cost less than timber walls”. If you have access to cheap local stone (e.g. Sydney sandstone or bush-rock), it’s very cost-effective. Stones also let water slowly pass, easing drainage.
- Cons: Laborious to build. Stones are heavy – even moderate blocks need machinery or lots of help. DIY is usually only for short garden walls (huge ones need an excavator). If mortar isn’t used, it takes skill to make them stable. Also, “less expensive” stones still run to a fair price if you buy them delivered (think $300–550/m² for something like sandstone blocks). Untrained DIYers might have a ramshackle wall if not careful.
- Cost Estimate: Stone varies widely by type. A guideline: about $300–550 per m² for cut sandstone blocks, maybe a bit more for high-quality bluestone or granite. Placing big boulders (supply + crane) could be $400–600/m² or more. For example, a 5m long, 1m tall cut-stone wall might cost ~$3–4k if self-built, more if hired.
- Suitability: Ideal for feature walls or terracing. Use it where you want a statement (like front yard entrance, or a rocky garden bed). Perfect if your Northern Beaches home has sandstone nearby – it blends right in. Good for all heights, especially steep slopes where you throw in boulders. But it’s not a casual weekend DIY unless it’s small.
- Eco-Factor: Stone is very green if local – it’s natural, long-lasting, and (if dry-stacked) requires no cement. If you “buy local stone” it’s similar to picking up the earth itself. Minimal chemical use (unless you cement it).
6. Retaining Wall Block Kits (Modular Systems)
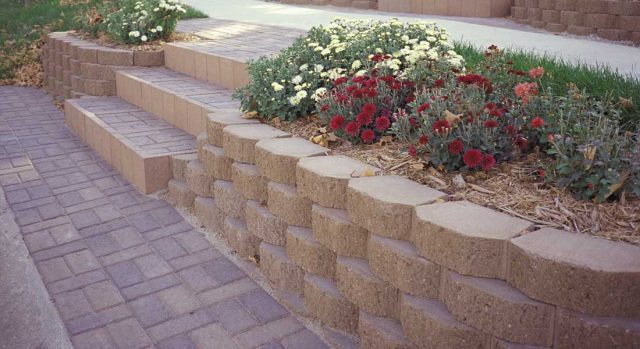
What: Pre-made block systems (e.g. Plasticca, Versalok, Redi-roc) that interlock or slot together. Think LEGO, but each piece is a chunky concrete or composite block.
Description: These kits come with shaped blocks and caps that simply stack. You can get them at Bunnings or landscaping outlets (sometimes called “retaining wall block kits”). They’re designed for DIY: each block is lighter than a standard cinder block and fits with the next. Some have hollow cores or built-in drainage.
- Pros: Easy assembly + design choices. They’re pre-cut so your wall looks neat (often with a textured face). According to one guide: “pre-designed blocks or panels … fit together, reducing the need for specialised skills.” Great for a weekend warrior. Kits often have matching garden edges or corner pieces, giving a polished look with minimal effort.
- Cons: Material cost and limited size. These kits can be pricey per block compared to loose rock or DIY sleepers. They’re usually for low walls (about 1m high); taller walls might need engineering. You still need a level gravel base and maybe rebar/geo-grid for stability. The plastic-based ones (if any) may fade or crack over time.
- Cost Estimate: Roughly $50–100 per block or up to ~$200/m² installed, depending on brand. As a ballpark, a 10m long, 0.5m high wall might be $2–3k all-up (materials+gravel). Prices vary widely by system – some Aussie block kits are very affordable, others less so.
- Suitability: Excellent for small to medium terraces or garden beds – a neat way to hold soil for veggies or flower strips. Especially good for curves or decorative walls because the blocks are uniform. Perfect for DIYers who want a tidy result.
- Eco-Factor: Most are concrete or polymer – not the greenest, but their long life and low maintenance helps. Some kits use recycled materials. The easy installation means less heavy equipment use.
7. Terraced (Multi-Level) Garden Beds
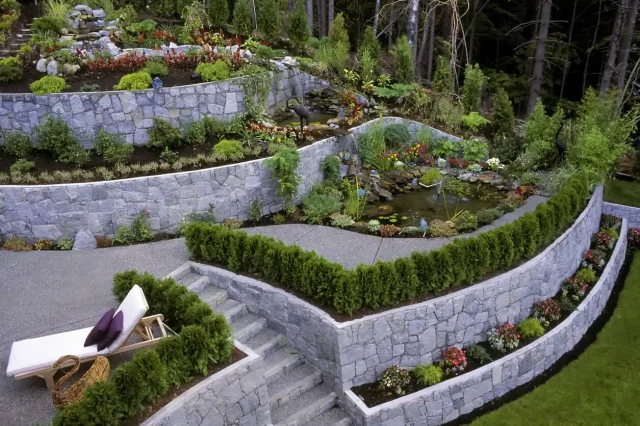
What: Instead of one tall wall, create a series of smaller steps/levels (like an amphitheater). Essentially, multiple short retaining walls or raised beds on a slope.
Description: Terracing uses the natural incline by cutting the slope into several flat platforms. You could build little walls of any material (logs, blocks, sleepers) at each level. It’s a “living staircase” for your garden. It’s often cheaper because each wall is low (no engineering needed) and you get extra planting space.
- Pros: Uses hillside naturally. You may end up using mostly soil and plants as your barriers – less hardcore structure. One tip: “Use the natural slope of your property and reduce the need for substantial construction by establishing many levels”. Terracing can look beautiful and yields multiple garden beds or sitting areas. It can cut down on concrete/masonry needs.
- Cons: More digging/work. You need to regrade and move soil by hand or machine. If the existing slope is very steep, building a series of terraces is a small construction project itself. You’ll still likely put in short retaining elements (like short walls of timber or stone) for each tier.
- Cost Estimate: Highly variable. If you mostly use soil (and cheap edging like sleepers or bricks), you could do it for well under $1000 for a small yard. A hired mini-digger for a day ($500–800) plus a bit of timber or blocks may build a DIY terrace.
- Suitability: Perfect for sloped yards or gardens – common in our Northern Beaches hills. Also great if you want a veggie garden on multiple levels. Very DIY-friendly if you can shovel dirt or rent a small loader.
- Eco-Factor: Terracing is inherently green – you’re moving soil and plants, not pouring new concrete. Use native plants in each level to help stability and habitat.
8. Reclaimed Wood and Pallets
What: Old timber boards, logs or upcycled pallets stacked as a wall. Imagine lining garden beds with old railway sleepers for free.
Description: This is literally scavenger DIY. Old railway sleepers, demolition timber, or free pallets can form a funky retaining wall. Pallets can be laid flat (filling the gaps with soil/plants) or stood upright. It’s definitely on the “cheap and quirky” end. A local tip: people sometimes ask on Gumtree for free pallets for just this purpose.
- Pros: Extremely low material cost. Pallets and scrap wood are often free or very cheap. You can upcycle – for example, stand pallets vertically and fill gaps with flowers. It’s creative and unique. No need to buy materials; many repurposed solutions here.
- Cons: Durability issues. Most old wood isn’t treated for ground contact. Pallets rot surprisingly fast in wet soil unless you seal them. Splinter hazard too. The structure can be flimsy unless well-anchored. A pallet wall looks very rustic/temporary. It’s really only for very low edging (say <0.5m).
- Cost Estimate: Minimal. You might spend $0–$50 on nails, screws, and a bit of clearing. Then your wall is basically “free”.
- Suitability: Good for small garden beds or decorative edging. Best in dry areas or raised beds where some wood rot won’t cause collapse. Fun for a weekend project or kiddie garden wall. Definitely DIY-only. Not for any serious load.
- Eco-Factor: Upcycling is inherently eco-friendly – you’re reusing materials. But note: used pallets may have been treated with chemicals, so avoid using them for growing edibles unless you seal them. If using untreated old logs or sleepers, it’s very natural.
9. Living Walls & Vegetated Retaining
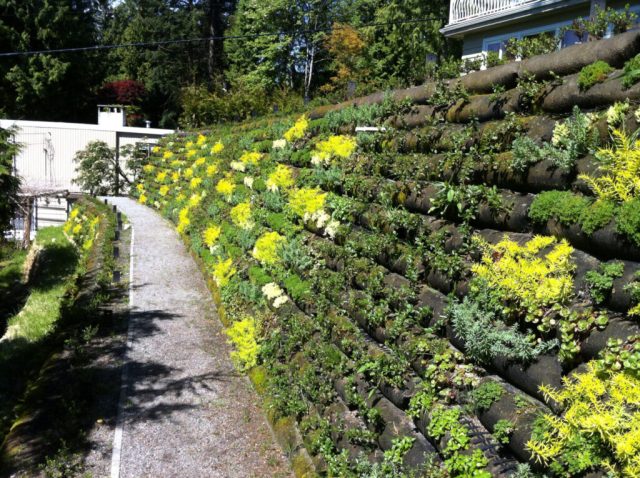
What: Walls planted with greenery or made of soil-filled geotextile containers. In essence, a wall that’s also a garden.
Description: This can mean a few things: one idea is to build a shallow wall and cover it with creepers (e.g. a vine-covered timber wall). Another is a pre-fabricated “geoweb” mesh on the slope that you fill with soil and plant grass or sedum over it. Or installing modular planter blocks that you fill with plants. It’s like camouflage for a wall.
- Pros: Stunning green look + cooling effect. A growing wall immediately softens the hardscape. It attracts birds and insects, and can even insulate your yard from heat. You might plant creeping fig on a block wall, or use a vertical garden wall panel. It turns “just a wall” into a feature.
- Cons: Higher initial cost and upkeep. These systems (geoweb, living wall panels) can be pricey to install. Plus, you must water and care for the plants. They’re not as rock-solid as concrete, and a poorly built living wall can slump if roots don’t bind the soil well.
- Cost Estimate: More variable. A geoweb grass wall might only cost a few hundred dollars if you do it yourself. Modular planters or living wall panels can be $100+ per square metre. That said, since walls are usually short, even $1000 can give a good green feature.
- Suitability: Fantastic for gardeners and eco-minded folks. Best in backyards where visuals matter more than heavy duty. Also great on small retaining walls (e.g. around a pool, garage pad) to hide the wall. Caution: In Northern Beaches you’ll want native or coastal plants that can handle sun and salt air.
- Eco-Factor: Excellent – these walls can improve air quality, reduce heat island effect, and create habitat. Using recycled materials (like old mason jars or reclaimed wood planters) for the structure ups the eco points. Just remember, the plants need a win-win: sun, water, and good soil.
10. Recycled & Innovative Materials

What: A grab-bag of creative, low-cost ideas: recycled plastic sleepers, used tires, earthbags, even living structures like willow weaves.
Description: If you truly want cheap and green, there are wild ideas. For example, plastic sleepers (made from recycled bottles) are sold in Aus – they last longer than wood and can cost similarly to wood sleepers. Old car tyres can be stacked and filled with soil for a terraced wall (paint them, and it’s a cool look). Earthbags (bags filled with sand/soil) create curved, organic walls. Even bamboo poles lashed together can hold a slope.
- Pros: Eco-hero material use. Using something destined for landfill (tires, bottles) prevents waste. Recycled plastic sleepers resist rot forever and require no maintenance. Creative designs (like a tire terrace) become conversation pieces. Many of these methods require minimal cost other than manual labor.
- Cons: Labor and novelty. Some solutions (earthbags or tire walls) take a lot of manual filling and packing. Permissibility may be an issue – for example, council may frown on a wall made of old tires if it looks shabby. Aesthetics can be “unconventional”. And yes, sometimes tires do off-gas a bit (though buried with soil is fine).
- Cost Estimate: Often very low. Recycled sleepers might be ~$200–300 per linear metre (similar to wood). Discarded items like pallets or tires can be free. The biggest cost is your time (and maybe rent a compactor).
- Suitability: These are for the bold DIYer and the sustainable home. Great if you have a fix-it attitude and want an “off-grid” vibe. Use them for low walls, garden art, or in eco-conscious community gardens. They’re usually not engineered solutions, so keep walls short (<1m) or terraced.
- Eco-Factor: Maximal. This is basically upcycling 101. Many of these solutions are literally carbon-negative (using rubbish). If done well, they prove cheap and kind to the planet.
Conclusion: There’s no one-size-fits-all wall for Northern Beaches homes, but lots of clever low-cost options. For small, DIY-friendly walls timber sleepers and block kits rock; for bigger jobs consider gabions or concrete sleepers. Let the landscape do some work with terraced gardens, and don’t forget the eco-twist: green/planter walls and recycled materials.
The cheapest overall? Likely that treated pine wall – especially if you’re handy and do it yourself. It won’t last forever, but it’ll be easy on your wallet and your eyes.
Which solution suits your style and yard? Have you tried building a wall yourself? Share your stories or questions below – we’d love to hear how you tackle slopes and erosion without draining the bank account!
FAQs
What is the cheapest retaining wall option for a sloped yard in the Northern Beaches?
The cheapest option is usually a treated pine sleeper wall, especially for low walls under 1 metre. It costs around $250–$350 per square metre, is relatively easy to install, and blends well with coastal landscaping. If you're handy, DIY installation can save even more.
Do I need council approval to build a retaining wall in the Northern Beaches?
In most cases, yes if the wall is over 600mm high, close to a boundary, or affects stormwater drainage. For anything under 600mm, you typically don’t need approval, but always check with Northern Beaches Council regulations or consult a builder to be safe.
Can I build a retaining wall myself, or do I need a professional?
You can DIY a retaining wall if it's under 1 metre high and made from lighter materials like timber sleepers, garden block kits, or gabions. Anything over 1 m tall, load-bearing, or involving drainage or footings should be left to a professional to meet structural safety standards.
What retaining wall material lasts the longest?
Concrete sleepers and stone walls offer the best longevity – often 20–50+ years with proper drainage. Timber is more budget-friendly upfront but typically needs replacing after 15–20 years, especially in wet or poorly drained soil.